
🎞️ The Beauty of Shooting Slightly Underexposed
- Nickos IV

- Oct 19, 2025
- 3 min read
Nickos here — today I want to take you behind the scenes of one of my favorite creative techniques: shooting slightly underexposed.
If you’ve been following my photography for a while, you’ve probably noticed that I often lean toward darker, moodier tones — rich shadows, deep contrasts, and cinematic color. None of that happens by accident. It begins in-camera, with the way I handle exposure.
Let’s break down not just why I shoot this way, but how you can do it too.
🌒 Why Underexposure Works
Most photographers chase perfect exposure, aiming to make their histogram perfectly centered. But the truth is, “perfect” exposure often kills mood.By underexposing slightly (usually –0.3 to –1 EV), I preserve the highlights — the most fragile part of any image. Once they’re blown out, that data is gone forever.
Underexposure gives you more editing flexibility, better color depth, and a sense of mystery. It allows light to feel alive rather than forced.
It’s like whispering instead of shouting — your photo invites the viewer in.
📷 The Technical Side
Here are the settings I usually play with during an underexposed shoot:
Mode: Manual or Aperture Priority
Exposure Compensation: –0.7 EV (a good sweet spot)
ISO: Keep it low (100–400) to avoid unnecessary noise in the shadows
Shutter Speed: Slightly faster than usual to cut some light but freeze motion
RAW Format: Always. You need those extra tones to lift shadows later without losing quality.
If you’re working in harsh sunlight, underexposing helps tame the brightness while keeping your subject’s texture and skin tone intact.In low light or indoors, it helps you capture atmosphere without over-brightening artificial light.
💡 When to Use It
Golden Hour Portraits: You keep the glow of the sun without bleaching the highlights.
City Nights or Street Scenes: Let the lights pop — not the noise.
Editorial & Fashion Work: It adds emotion and a cinematic tone that feels intentional.
Remember, underexposure isn’t just for dark moods. Even bright, airy scenes benefit from slightly holding back light — it gives you space to shape it later.
🖌️ My Editing Workflow
Here’s exactly how I process an underexposed RAW file:
Lift Shadows, Not Exposure: I never simply increase exposure. Instead, I gently lift the shadows using the Tone Curve or Shadows slider. This maintains contrast.
Protect the Midtones: The midtones are where the life of your image lives — especially skin tones. Avoid flattening them. Instead, adjust Blacks and Whites separately to maintain dynamic range.
Color Grading: I often cool down the shadows (toward teal or blue) and warm up the highlights (toward orange). This creates a cinematic “color contrast.”
Local Adjustments: Using radial or brush masks, I selectively brighten areas that I want the viewer’s eye to follow — like the face, hands, or specific reflections.
Final Touch: A little clarity or texture goes a long way. Don’t overdo it. I prefer to use soft light in editing just like in shooting — controlled and deliberate.
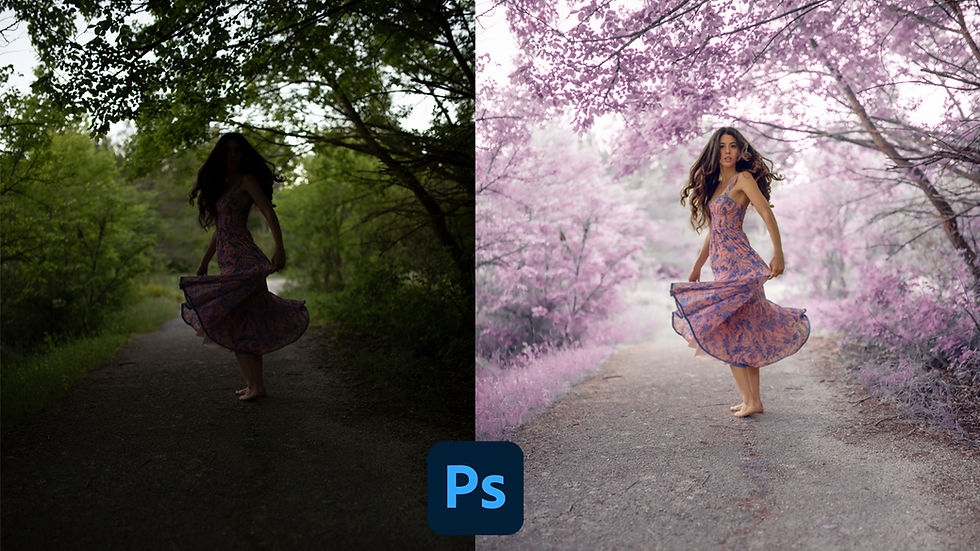
🧠 Before & After Example
Here’s a real-world example from one of my recent shoots:
RAW settings: ISO 100 / f1.4 / 1/320s / –0.7 EV
Lighting: Natural window light, no reflector
Goal: Keep skin texture realistic while preserving soft highlights on the cheekbones
After editing, the highlights stayed intact, and the final image had this quiet depth that draws you in — something impossible if it were shot perfectly exposed.

✨ Final Thoughts
Underexposing is not a “mistake.”It’s a stylistic choice — a way of seeing light not just as brightness, but as emotion.
Every time I shoot slightly darker, I remind myself:
“I’m not hiding light. I’m giving it direction.”
Try it in your next session — start with –0.7 EV, shoot in RAW, and trust the process. Once you bring it into post, you’ll see how much more control you have over the mood, tone, and storytelling of your work.
🎓 Want to go deeper?In my course Mastering Photoshop, I show exactly how I color grade and retouch my underexposed portraits, step by step — from RAW to final.
👉 Check it out here: https://www.ivphotographylab.com/challenge-page/Photoshopcourse
Thank you so much for supporting my work and helping me keep creating these deep-dive tutorials.If you try this method, upload your before/after in the comments — I’d love to feature a few in next month’s post!
Until next time,
Nickos IV 🎥✨


Comments